Lemon Dill Cannellini Dip (Oil-Free)
This creamy whipped Lemon Dill Cannellini Dip is incredibly delicious and super easy to make in just 5 minutes. Simple but loaded with flavor, this budget-friendly white bean dip comes together with pantry ingredients and it’s perfect with raw veggies, crackers, or pita chips!

This post may contain affiliate links which means we earn a tiny commission when you use our links. This does not increase the price you pay for what you purchase but the pennies we earn from it help support our site and help us provide more free recipes for you. See our disclosure policy for details.
Is this white bean dip just a front for me posting another hummus recipe? Possibly.
But it’s ALSO a fancy lemon dill cannellini dip! But I’m sure you saw that in the title.
I looove making different hummus and dip recipes to enjoy each week with my raw veggie plates (and or with oil-free crackers or rice cakes or even as a sandwich spread like in my hummus veggie sandwich)!
My favorites so far have been my Edamame Guacamole, Pizza Hummus, Butter Bean Hummus, and Spinach Artichoke Hummus! But honorable mentions for sure go to my Beet Hummus and Classic Creamy Hummus!
But nothing beats a new dip recipe in my opinion, and this cannellini dip is a really good one. It’s got tart lemon flavor with a ton of umami and freshness from the dill. You will love this flavorful white bean dip recipe.
It’s great with so much more than just raw veggies or crackers too. Serve it in a grain bowl or as a sandwich filling or a wrap filling. Swirl a bunch of it on a plate and top with roasted asparagus or broccolini for a fancy dinner. Or honestly, eat it with a spoon. We listen and we don’t judge.
Anyway, you have to try this cannellini dip. Onto the recipe!
Ingredients
See the recipe card below for the full ingredients list (with amounts) and instructions.
- White Beans: I generally always have cannellini beans on hand, both because I cook them from dried cannellini beans (in my Instant Pot) and and because I keep some cans handy for when I don’t have any prepped.
- Steamed Cauliflower: This seems like a weird ingredient to have in here, but hear me out: it increases the bulk of the white bean dip without adding many calories, it sneaks in more veggies (cruciferous veggies at that!), and you can’t taste it! I use frozen cauliflower in this recipe (florets or riced cauliflower, it doesn’t matter because it’s getting blended up), but if you use fresh just cook it until it’s soft.
- Lemon Juice: While fresh-squeezed tastes the best, I know not everyone has lemons in the house at all times (even I don’t!). The best bottled lemon juice in my opinion is Italian Volcano brand. It’s an organic lemon juice with only one ingredient and the flavor is very close to fresh. I buy mine in a 2-pack from Costco!
- White or Yellow Miso Paste: This is to replace the salt in the recipe, but I also love the little hint of umami flavors. Per Dr. Michael Greger of NutritionFacts.org, the soy in miso has a protective effect so the sodium in miso paste will not affect us negatively.
- Nutritional Yeast: This recipe uses a tiny bit of nutritional yeast for the savory and nutty flavor. It does NOT make the white bean dip taste cheesy (though I will be posting a cheesy hummus recipe soon!).
- Granulated Onion and Granulated Garlic: For flavor!
- Dried Dill: I always have dried herbs on hand and find them to be much more economical than fresh herbs. If you grow your own herbs or don’t mind paying the premium, feel free to use fresh here—just make sure to use about 3 times the amount as I indicate for dried, as the dried herb is more of a concentrated flavor.

Substitutions
- White Beans: Technically you can use ANY cooked white beans for this white bean dip recipe, such as great northern beans, navy beans, cannellini beans, or butter beans. You could even use garbanzo beans (AKA chickpeas).
- Steamed Cauliflower: So this is the easiest veggie to add / hide in this cannellini bean dip because you can’t taste it OR see it. Technically you could do any other well-cooked veggie and it probably wouldn’t have a big impact on the flavor, but it might change the color. If you don’t care about that, then experiment away! I can’t guarantee the results, of course, since I’ve only tested this recipe with cauliflower.
- Lemon Juice: If you don’t have this you could try a little vinegar instead! I wouldn’t use balsamic though; that would change the flavor of the recipe.
- White or Yellow Miso Paste: If you’re fine eating salt (or if you eat the potassium chloride salt substitute) you can go ahead and use that. If you are totally avoiding added sodium, you can leave it out, and maybe add a little more lemon juice and spices/herbs!
- Nutritional Yeast: You can omit this ingredient if you prefer.
- Granulated Onion and Granulated Garlic: These are the spices I like in this recipe. Feel free to play around and add what you like. If you want it spicy, go ahead and add your favorite hot spice. If you want it smoky, add some smoked paprika. Use my recipe as a jumping off point (at your own risk, haha!).
- Dried Dill: Feel free to use another herb instead if you prefer, such as basil or thyme!

How to Make Lemon Dill Cannellini Dip
- Add all but one ingredient to the blender: Add all the ingredients to the blender EXCEPT the dill. Remember, this recipe includes the liquid in the can of cannellini beans (if using canned. If you don’t have this, you can use around a half cup ice cold water, adding as needed to blend.)
- Blend: Place the lid on the blender and blend on high for about 90 seconds or as long as two minutes for next level creamy cannellini bean hummus. If you do not have a high-powered blender (such as a Vitamix or Blendtec), you may need to either stop and scrape down the sides every so often with a spatula, or you may need a bit more liquid to blend. Try adding a tablespoon of ice water and using a spatula (stop the blender first!) to move the dip to allow the liquid to get down to the blades.
- Taste and adjust: Now is the best time to adjust the flavor of the base. Is it salty enough? If not, add a teaspoon of miso (or a quarter teaspoon of salt). Is it acidic enough? If not, add a tablespoon of lemon juice. Blend again and taste again. Adjust until you are happy with it.
- Add the dill: Add the dried dill (or chopped fresh dill, if using). Pulse or blend on a low speed for 4-8 seconds until the dill is fully mixed in but not pulverized.
- Store: Scrape the contents of the blender (I like a blender spatula to get every last bit) into a jar or airtight container and refrigerate your white bean dip for up to 5 days. It can be used right away, but if you want it to be cold, refrigerate it for at least 2-3 hours before using. You can also warm it up if you prefer!

Expert Tips
- Individual Portions: Taking your cannellini dip to work or school? It makes a delicious snack with red peppers, cucumbers, etc. Place your individual portions of white bean dip in small containers and throw one in your lunch box each day! The next time you need a quick snack, simply grab some baby carrots and a little container of your healthy homemade hummus!
- Change Up The Spices: Customize the flavor by using the spices you like! Play around with combinations and write down your experiments. Eventually you’ll find some you really enjoy and you can make them on a regular basis!
- Cooking Dried Beans: If you are using dried cannellini beans instead of canned cannellini beans, you can make a big batch and freeze what you don’t use. Make sure to save the cooking liquid too!
Serving Suggestions
The best part about hummus and dip recipes is that you can use them in so many different ways. Use this cannellini dip the same way you’d use traditional chickpea hummus.
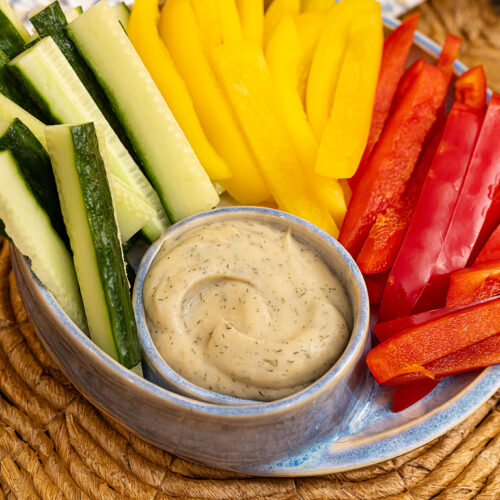
Of course my favorite way to serve this lemon dill white bean dip is with a huge plate of raw vegetables such as cucumber, bell pepper, celery, carrots, sugar snap peas, or raw fennel.
A great appetizer for a party could include a large bowl of this cannellini dip (maybe a double batch!) and pita chips or warmed pita bread (you can usually find both at any grocery store).
You could swirl it on a plate and top it with cooked vegetables like asparagus or baby broccoli and it would make for a stunning presentation.
Add a large dollop of this white bean dip to any bowl as the dressing (or in addition to it) and it will add tons of flavor, fiber, protein, and other nutrients as well.
Use it as a spread on sprouted whole grain toast to make a sandwich like with my hummus veggie sandwich, or you can find some wraps if you prefer a wrap. Or dilute it with a little water or liquid of choice for a delicious salad dressing.
Or toss this white bean hummus dip with warm cooked potatoes and other vegetables for a creamy and flavorful dish. Great cold or warmed, actually, very much like my whole food plant based potato salad.
More Plant Based Dips and Spreads to Try
- Butter Bean Hummus
- Healthy Chickpea Tuna Salad
- Spinach Artichoke Hummus
- Plant Based Nacho Cheese Sauce
- Beet Hummus
- Silken Tofu Ranch Dressing
- Pizza Hummus
- Oil-Free Pesto
- Creamy Tomato Silken Tofu Pasta Sauce
- Classic Oil-Free Hummus
- Edamame Guacamole
- Silken Tofu Cheese Sauce

Lemon Dill Cannellini Dip
Equipment
- 1 Blender
Ingredients
- 15 Ounces Cannellini Beans, including the liquid in the can (see note 1)
- 12 Ounces Cauliflower, cooked (see note 2)
- ¼ Cup Lemon Juice,
- 2 Tablespoons Nutritional Yeast, see note 3
- 1 Tablespoon White or Yellow Miso Paste, see note 4
- 1 + ½ teaspoons Granulated Onion
- 1 + ½ teaspoons Granulated Garlic
- 2 teaspoons Dried Dill, see note 5
Instructions
- Add all but one ingredient to the blender: Add all the ingredients to the blender EXCEPT the dill. Remember, this recipe includes the liquid in the can of cannellini beans (if using canned. If you don't have this, you can use around a half cup ice cold water, adding as needed to blend.)
- Blend: Place the lid on the blender and blend on high for about 90 seconds or as long as two minutes for next level creamy cannellini bean hummus. If you do not have a high-powered blender (such as a Vitamix or Blendtec), you may need to either stop and scrape down the sides every so often with a spatula, or you may need a bit more liquid to blend. Try adding a tablespoon of ice water and using a spatula (stop the blender first!) to move the dip to allow the liquid to get down to the blades.
- Taste and adjust: Now is the best time to adjust the flavor of the base. Is it salty enough? If not, add a teaspoon of miso (or a quarter teaspoon of salt). Is it acidic enough? If not, add a tablespoon of lemon juice. Blend again and taste again. Adjust until you are happy with it.
- Add the dill: Add the dried dill (or chopped fresh dill, if using). Pulse or blend on a low speed for 4-8 seconds until the dill is fully mixed in but not pulverized.
- Store: Scrape the contents of the blender (I like a blender spatula to get every last bit) into a jar or airtight container and refrigerate your white bean dip for up to 5 days. It can be used right away, but if you want it to be cold, refrigerate it for at least 2-3 hours before using. You can also warm it up if you prefer!
Notes
- White Beans: I generally always have cannellini beans on hand, both because I cook them from dried cannellini beans (in my Instant Pot) and and because I keep some cans handy for when I don’t have any prepped. Any white beans will work for this recipe, by the way!
- Steamed Cauliflower: This seems like a weird ingredient to have in here, but hear me out: it increases the bulk of the white bean dip without adding many calories, it sneaks in more veggies (cruciferous veggies at that!), and you can’t taste it! I use frozen cauliflower in this recipe (florets or riced cauliflower, it doesn’t matter because it’s getting blended up), but if you use fresh just cook it until it’s soft.
- Lemon Juice: While fresh-squeezed tastes the best, I know not everyone has lemons in the house at all times (even I don’t!). The best bottled lemon juice in my opinion is Italian Volcano brand. It’s an organic lemon juice with only one ingredient and the flavor is very close to fresh. I buy mine in a 2-pack from Costco!
- White or Yellow Miso Paste: This is to replace the salt in the recipe, but I also love the little hint of umami flavors. Per Dr. Michael Greger of NutritionFacts.org, the soy in miso has a protective effect so the sodium in miso paste will not affect us negatively.
- Nutritional Yeast: This recipe uses a tiny bit of nutritional yeast for the savory and nutty flavor. It does NOT make the white bean dip taste cheesy (though I will be posting a cheesy hummus recipe soon!).
- Dried Dill: I always have dried herbs on hand and find them to be much more economical than fresh herbs. If you grow your own herbs or don’t mind paying the premium, feel free to use fresh here—just make sure to use about 3 times the amount as I indicate for dried, as the dried herb is more of a concentrated flavor.